|
|
 |
Decision
Analysis |
 |
-
Data Worksheet |
|
|
Pressing the OK button on the Model dialog causes the data worksheet
to be constructed. Part of the worksheet is shown in the figure
below after the data has been entered for the example problem.
On the remainder of this page, we describe the contents of the
data worksheet.
Along the top of the display starting in column F, the yellow
areas hold the parameters of the model. These are determined
by buttons in the Model dialog. The values are colored
yellow to indicate that these should not be changed directly
by the user. Some of parameters may be changed by clicking
the Change Structure button. Others cannot be changed
once the model worksheet is constructed. |
| |
|
Arc Data |
| |
The range starting in cell D9 and
going downward and to the right holds the arc data. Each arc
has an index that is automatically provided by the program. Columns
E through H are filled by the user to describe the particular
model. Generally, cells with white backgrounds and maroon borders
are for user data entry. Every arc passes from one node to another,
called respectively the from node and the to node.
The indices of these two nodes are placed in columns E and F.
The Arc Cost column is included when the Arc Value button
is clicked in the Model dialog. The Arc Probability column
is always present. Arcs leaving decision nodes should always
have a 1 probability for the Function solver option. For
the Algorithm option, optimum arcs have a 1 probability,
while non-optimum arcs have 0. The probability values for arcs
leaving decision nodes are set by the program.
Arcs leaving chance nodes have positive probabilities
that must sum to 1 for a given chance node. Both arc
costs and arc probabilities can be determined by Excel
functions. If cells outside the arc display are referenced
in a function, the function should use absolute references.
Columns I and J hold the names of the from and to nodes.
These are provided so that an arc can be easily identified
by its end points. These two columns hold Excel formulas.
Their yellow color indicates that the user should not
change them.
Column K holds the names of the arcs. Arcs are originally
given the same name as the name of the to node.
The pink color of this column means that the user may
change arc names. A name can easily be changing by typing
a text name over the formula.
Column L holds the solution values associated with the
arcs and are used by the solution procedure. These are
determined by formulas in these cells. The formulas should
not be changed.
The data shown in the arc data table is for the example
problem. |
Node Data |
| |
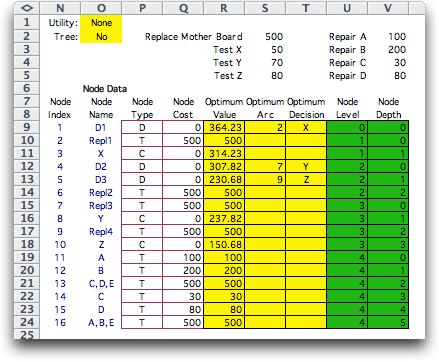
The node data is found starting in cell N9 and
continuing downward and to the right. For the example we have
placed data that is specific to the repair problem in rows
2 through 5. Values and formulas in the arc and node arrays
reference these data values with absolute addresses.

Considering rows 9 and below we see in column N the node indices
assigned sequentially by the program. These numbers may change
for a particular node if the node data is sorted or new nodes
are inserted in the list. Column O gives the node names for
the example. These are provided by the user with the names
representing the meaning of the nodes. Column P lists the type
of each node, D for decision, C for chance, and T for terminal.
Column Q holds the node values. In this case only terminal
nodes have values.
When the model is optimized, column R holds the optimum value
for each node. In the case of a decision node, it is the value
of the objective if the optimum decisions are followed from
that node and all subsequent nodes. In the case of a chance
node, it is the expected value at that node when following
the optimum decisions in all subsequent nodes. For a terminal
node, column R holds the value assigned to the node. Column
S holds the arc index of the optimum decision for a decision
node and is left blank for chance and terminal nodes. Column
T holds the arc name associated with the index in column S.
Columns U and V hold the Level and Depth for
each node. These are used to determine the placement of the
nodes in the graphical representation. They are colored green
to indicate that the program has placed numerical values into
these cells. The cell values may be changed by the user when
using the manual node placement option.
|
Change Structure Button |
| |
 |
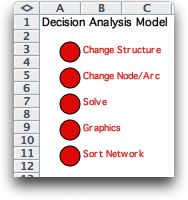
We see in column A of the worksheet a series
of buttons that can be used to change features of the model
or initiate the procedures of the add-in. We describe the
purpose of these buttons on the remainder of the page. |
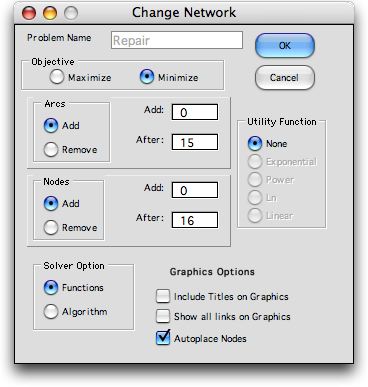
Clicking the Change Structure button presents the dialog below.
A button or field shown in gray cannot be changed. For example,
the name of the model cannot be changed once the worksheet
is constructed. Similarly, if a utility function is not initially
specified, it cannot be changed.
The fields and buttons on the dialog allow other
features of the model to be changed. For example, the direction
of optimization, the solver option and the graphic options
can be changed by clicking the appropriate buttons. Nodes and
arcs can added or removed by clicking the appropriate button
and filling the fields for the Arcs and Nodes areas.

On clicking the OK button, the worksheet is modified
to incorporate the requested changes. |
Change Node/Arc Button |
| |
When this button is pressed, the
dialog below is presented. It allows nodes and arcs to be added
and features associated with particular nodes and arcs to be
changed. The specific case below shows the options associated
with changing an arc. The user can change the start and/or end
node of the arc, as well as its probability, value, parameter
and name. If a feature is not present, as arc parameter for the
example, the field is shown in gray.
If New is specified as the end node, a new node is
created and placed at the bottom of the node data list. |
| |
|
| |
The figure below shows the dialog
for adding an arc. When this option is chosen, the number field
at the far right is enabled. This allows several arcs to be added
with one step. This is particularly useful to build a model in
an incremental manner. |
| |
|
| |
With the change node option chosen, only the node area at
the left is enabled. The type, value, parameter and name of
the node can then be changed.
In every case changes are accomplished by clicking the Change
button. This causes the data areas for the nodes and arcs to
be adjusted without leaving the dialog. This is helpful when
making a series of related changes. The dialog may be moved
on the display so that the current and changed values can be
easily observed.
|
Solve Button |
| |
Clicking the Solve button
causes the program to check the network for correctness. Some
rules that must be satisfied are: the network must contain no
cycles, decision and chance nodes must have at least one leaving
arc, the probabilities for the arcs leaving a chance node must
sum to 1, terminal nodes must have no leaving arcs. Violation
of these and other programmed rules cause warning messages to
be issued.
With the Algorithm solution option, the solution algorithm
is initiated by the Solve button and the optimum solution
is placed on the worksheet. |
Graphics Button |
| |
Clicking this button creates a new
worksheet for the graphics presentation, if it does not already
exist. Nodes are placed on the worksheet using the Level and
Depth values. These are automatically determined if the Autoplace
option has been selected. |
Sort Network Button |
| |
When building a network by adding
nodes and arcs, the nodes and arcs are often placed in a non-intuitive
sequence. Building and maintaining a network is easier if the
nodes and arcs are sorted. Clicking this button causes the node
data arrays to be sorted first by level and then by node
name. After a node sort, the nodes are renumbered so the
node indices are consecutive and increasing. This changes the
indices associated with the nodes. Since the from and to nodes
for the arcs are specified as node indices, the indices defining
an arc must be adjusted to reflect the sorted node values. This
is done automatically by the program.
Arcs are also sorted, first by from node index
and second by arc name.
When fields of the node and arc data arrays contain formulas
that refer to cells outside the data arrays, care must
be taken so that these references are not invalidated by
the sorting. This is accomplished by using absolute references
in formulas. For example, a relative reference to cell
A1 is simply A1. An absolute reference is $A$1. When absolute
references are used, sorting cannot disturb them. Absolute
references are also obtained by referring to cells by name.
Using named references for formulas is a powerful feature
of Excel. |
Changes on the Graphic Worksheet |
| |
When a graphic representation of
the network is created a Change Node/Arc button is placed
on the graphic worksheet. This allows the changes to be made
while the user looks at the graphical representation. When the
Change button is pressed the graphic is redrawn. |
| |
|
New Functions |
| |
The add-in introduces three new functions
available to Excel when the add-in is loaded. Excel calls these
User Defined Functions. The three functions are listed below
with a definition of their parameters.
-
MinIF(A, k, B): for the set of entries in
the array A that are equal to k, find the minimum
of the corresponding set of entries in the array B.
-
MaxIF(A, k, B): for the set of entries in
the array A that are equal to k, find the maximum
of the corresponding set of entries in the array B.
-
MatchIF(A, k, B, m): for the set of entries
in the array A that are equal to k, find the index
of the entry in array B whose value is the same as
m. Return the corresponding index of B.
-
SumProductIF(A, k, B, C):
for the set of entries in the array A that are equal
to k, find the corresponding sum of the products of the
elements of B and C.
Return the sum of the products.
In each case A and B (and C for
SumProductIF) are equal length arrays on the worksheet. k and
m are numbers, letters or references to a cells. The functions
are like the SUMIF Excel function. The functions are used in
the Optimum Value column and the Optimum Arc column
of the node data. They are also used to find the maximum and
minimum of the terminal values when utility functions are used. |
| |
|
|


