| |
The routing add-in uses several worksheets
in an Excel workbook. This page describes the sequence of construction
of these pages. When the page images are small, click the image
for a larger display. |
|
|
|
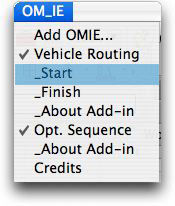
The modeling process begins by choosing
the Start command
on the Vehicle Routing menu. This command performs
two functions. It creates a worksheet that contains a list
of general instructions. The Distance Button on
the Start worksheet creates the Distance worksheet.
When the Start command is used for a workbook
that already contains add-in worksheets, all the buttons
in the workbook are re-created. This eliminates linking
problems when a workbook is opened on a computer other
than the computer that created it.
Before closing an add-in workbook, it is
good practice to choose the Finish command. This
deletes buttons on the worksheets. Workbooks without buttons
will open on any computer, while workbooks with buttons
will work successfully on only the computer that created
the buttons. The Start command or the Links command
of Excel will correct link errors.
Models that use geographic coordinates contain
the user-defined function "GreatCircleDistance".
The function will not work on a computer different than
the computer that created the workbook. The Finish button
removes references to this function and the Start button
restores the references. |
|
| |
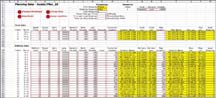
Part of the Start
Page is shown below. The first step is to make a distance
worksheet by clicking the button.
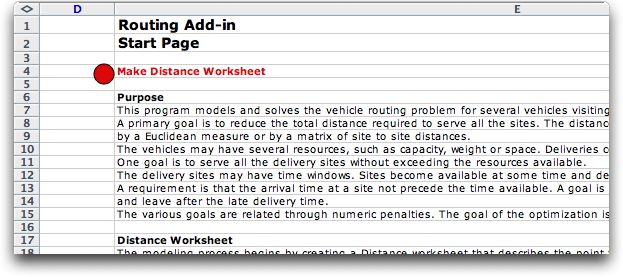
The examples for this page are from the Excel
workbook, route_austin.xls.
|
Distance Worksheet |
| |
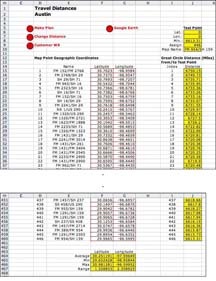 |
The Make Distance Worksheet button
on the Start worksheet
creates the Distance worksheet. The distance worksheet
accepts map locations. Cartesian or Geographic coordinates
may describe locations. Distances may be computed by the
length of straight lines between coordinates (Euclidean),
the length of the curved path on the surface of the earth
(Great Circle Distance), or with a matrix whose distances
are obtained from some other source (perhaps Google Map).
A workbook may have more than one distance worksheet. The
examples on the left illustrate distances computed with
the Euclidean metric.
The map data on the distance worksheet of the example
has 646 entries. Each entry describes an intersection of
major highways in the Austin area. The locations are described
with geographic coordinates. Distances are measured in
miles. |
|
Customer |
| |
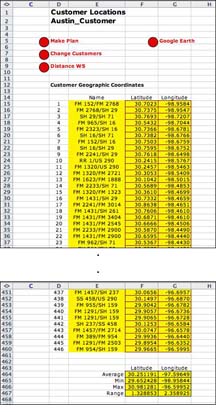 |
When the distance worksheet is created,
a second worksheet called the Customer worksheet is
also created. For many problems, customers or deliveries
are not located at the same coordinates as locations
that describe the map. This second worksheet is created
to hold the independent coordinates of customers.
For the example we make the customer locations the same
as the map locations. The data including the names and
coordinates
are transferred from the distance worksheet. For this reason
the cells are colored yellow.
|
|
|
| |
|
The second step is to create a Planning
Data worksheet that holds data for a specific routing
instance, perhaps the deliveries to be made on a given
day. The data describes deliveries and vehicles (called
trucks). There may be several trucks. Trucks have limited
resources, such as capacity, and deliveries use up the
resources. The times available, early and late delivery
times are on this worksheet. A duration penalty can be
used to establish priorities between deliveries. The costs
of penalty violations are also on this page. Each delivery
location is associated with a map location on the Distance
worksheet. Click the Make Plan button on the Distance worksheet
to create a Planning Data worksheet. |
|
Results Worksheet |
| |
|
The third step is to create the Results and Model worksheets.
Create these sheets by clicking the Make Model button
on the Plan worksheet. Each Plan worksheet has unique Model and Results worksheets.
The Results worksheet indicates the current route
and the associated truck assignments and delivery times for
the route. Buttons at the top of the worksheet call various
heuristic processes that find solutions. |
|
Model Worksheet |
| |
|
The Model worksheet creates a form
used by the Opt. Sequence add-in to search for
good solutions. The Opt. Sequence add-in must be
installed to find solutions. Download the add-in from the
OM/IE add-in page or click the link at the left. |
|
Map Worksheet |
| |
|
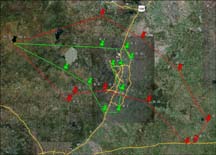
A map of the route is created on a separate
worksheet when the Map button is clicked on the Results
or Model worksheets. Colors indicate the routes of different
vehicles. |
|
An alternative to the Excel map, the add-in can create
a program that is used with Google Earth to display a routing
solution. The figure at the left was copied from the Google
Earth. |
|
| |
The remaining pages of this section
describe the features and implementation of the routing add-in. |
| |
|